
[TUTORIAL] How to speed up your radio station website with Cloudflare

Updated December 2025.
The video below is very useful, but some screens and settings are now different. Read the post below for the most up to date information.
How to Set Up Cloudflare for Your Website and Improve Performance
In this tutorial, you’ll learn how to use Cloudflare to boost your website’s performance, whether you’re on our Pro Radio hosting or any other provider.
It’s especially useful for radio stations, where traditional caching often causes outdated content (old tracks, shows, images) to appear.
Understanding Your Website’s Performance
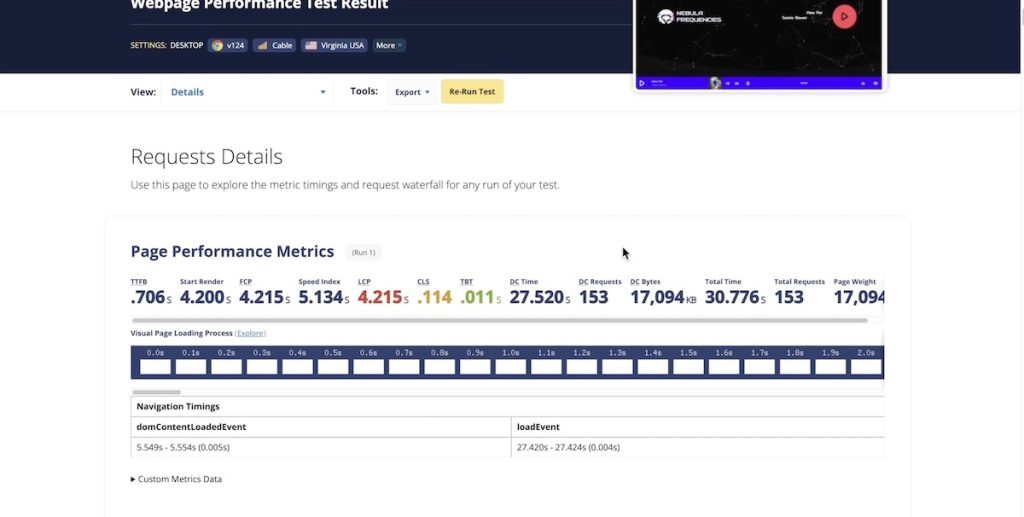
Before touching any settings, it’s important to measure your site properly.
For this, use webpagetest.org. Unlike GTmetrix or Google PageSpeed, it gives you a detailed breakdown of every component of your website, so you can clearly see what needs improvement.
A radio website behaves more like a web app or a live stream: it never really “finishes” loading.
The page keeps updating:
- Radio shows
- Song titles
- Cover images
- Dynamic widgets
Because of this, tools often report very long “total load times” (e.g. 30+ seconds). That number is misleading: the site is not actually slow, it’s just continuously updating, and the test tool thinks the page is still loading.
For radio sites, the key metrics to watch are:
- Start Render – when the page first appears to the user
- Largest Contentful Paint (LCP) – when the main visible content finishes loading
In this tutorial, the website used for testing is intentionally not optimized:
- Many full-resolution, uncompressed images
- Several video backgrounds
- No server-side caching or compression
The only goal here is to show how to correctly configure Cloudflare for a radio station website and then run a quick test to see what kind of performance improvement this setup can provide.
️ Setting Up Cloudflare
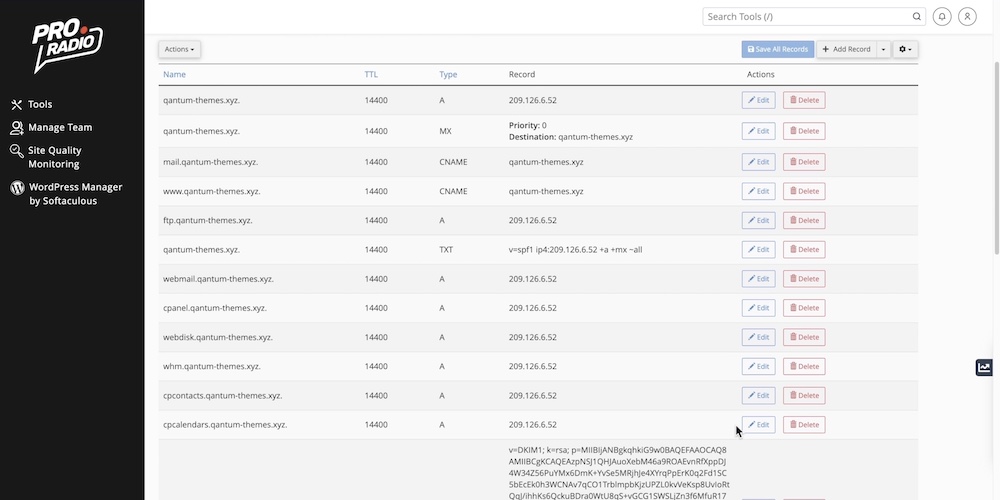
First, create a Cloudflare account and add your domain. Cloudflare will scan your DNS, but sometimes it may miss some records. In such cases, manually check your DNS records on your hosting provider’s platform. Then, copy over the missing records to Cloudflare.
Next, change your name servers to those provided by Cloudflare. This step is crucial for Cloudflare to work effectively. After changing the name servers, wait for them to update, usually within an hour.
Optimizing Performance
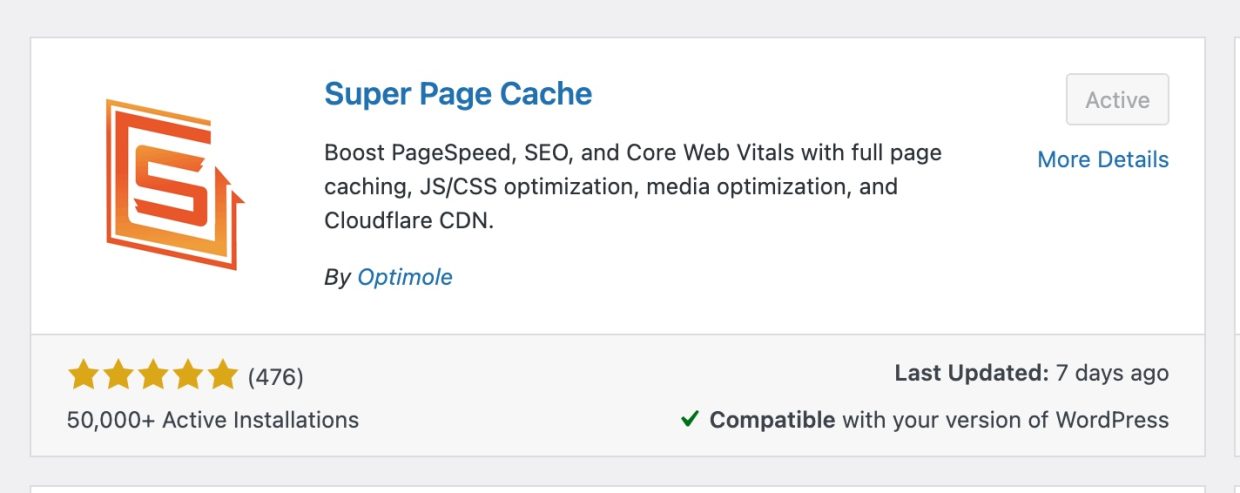
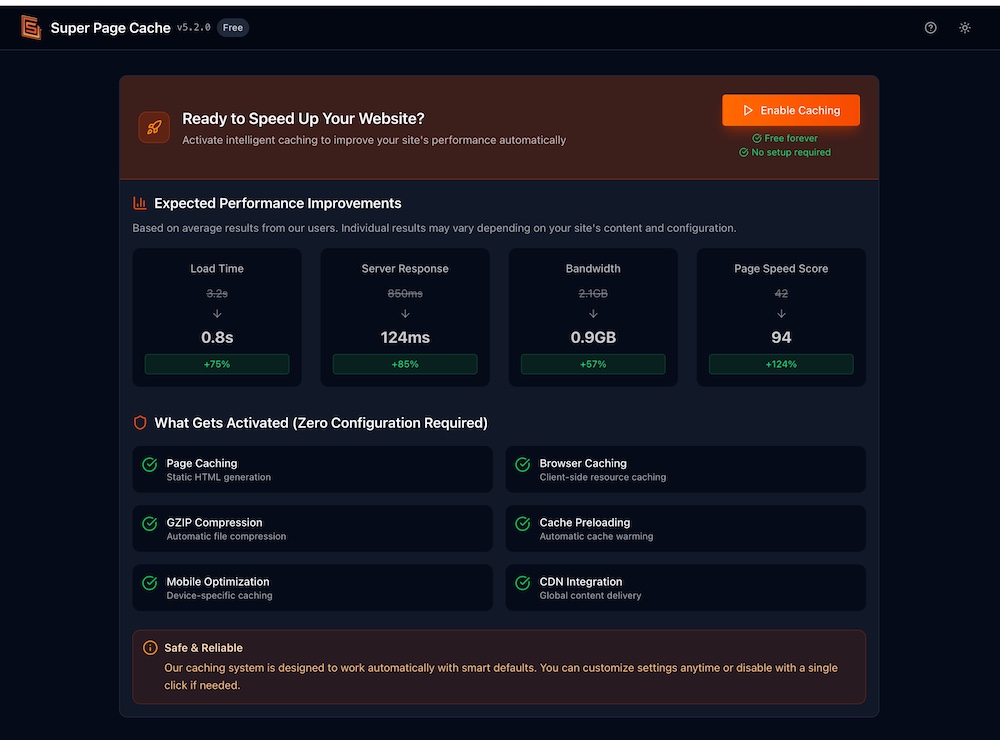
Once Cloudflare is set up, we need to configure caching parameters. Install the “Super Page Cache” plugin and link it to your Cloudflare account using the API key.
Once installed, click “Enable Caching”
Now from the left menu open the Super Page Cache > Settings and set the correct exclusion rules:
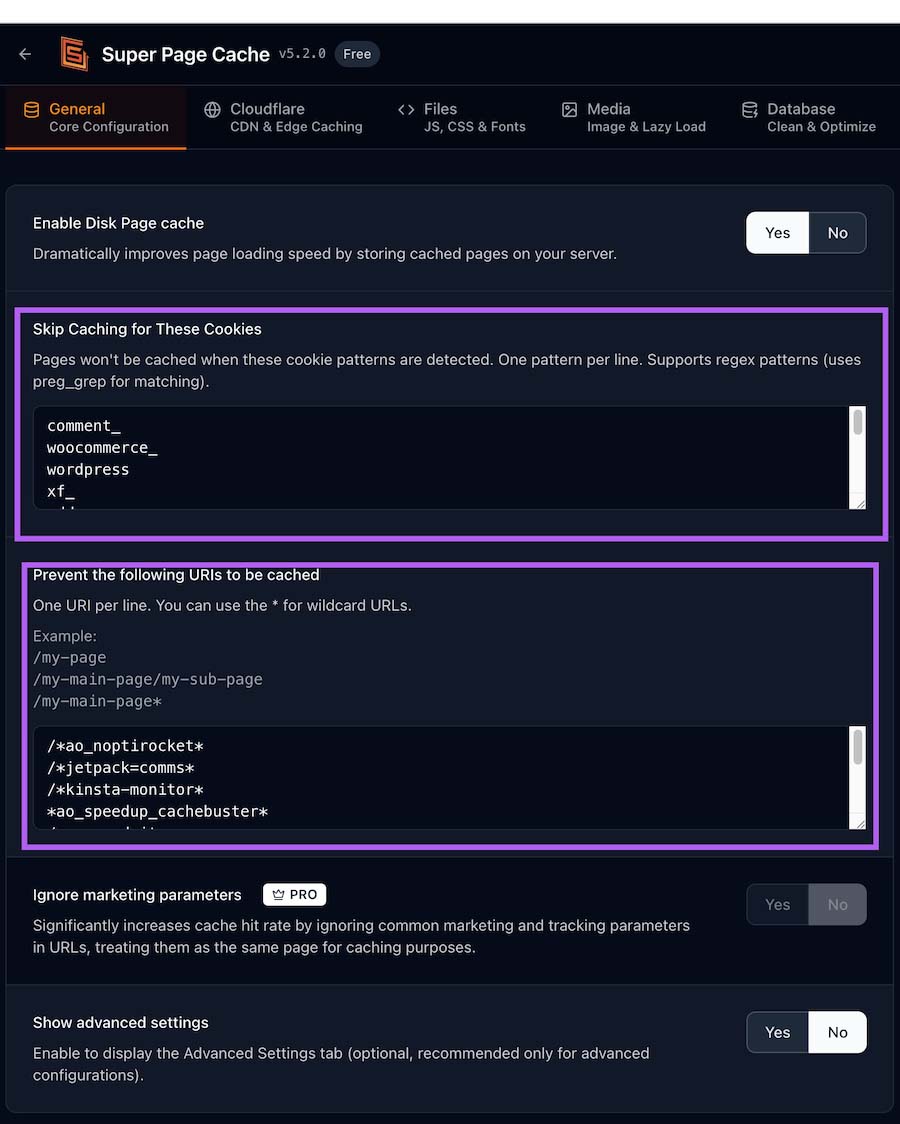
Cookies to exclude:
^wordpress_logged_in_
^wp-
^comment_
^woocommerce_
^wordpressuser_
^wordpresspass_
^wordpress_sec_
URL to exclude:
/wp-content/uploads/elementor/*
/wp-content/plugins/*/elementor/
/wp-content/plugins/elementor/*
/admin-ajax.php*
/wp-admin/*
*nocache*
/cart/*
/checkout/*
/my-account/*
/*wc-ajax*
*wc-ajax*
*qtproxycall*
/my-account*
/wc-api/*
/wp-json/*
/wp-admin/admin-ajax.php*
/?add-to-cart=*
/?removed_item=*
/?re-add-to-cart=*
/?order-pay=*
/?key=*
/?wc-ajax=*
/qtproxyurl*
*noajax*
*ao_noptirocket*
*ao_speedup_cachebuster*
*jetpack=comms*
*kinsta-monitor*
Below the settings click YES on “Show advanced settings”

Now in Cache Lifespan, set 600. This is the maximum time the site can display outdated content, so you don’t want to show the previous radio show for more than 5 minutes. For a radio station is better a smaller time.

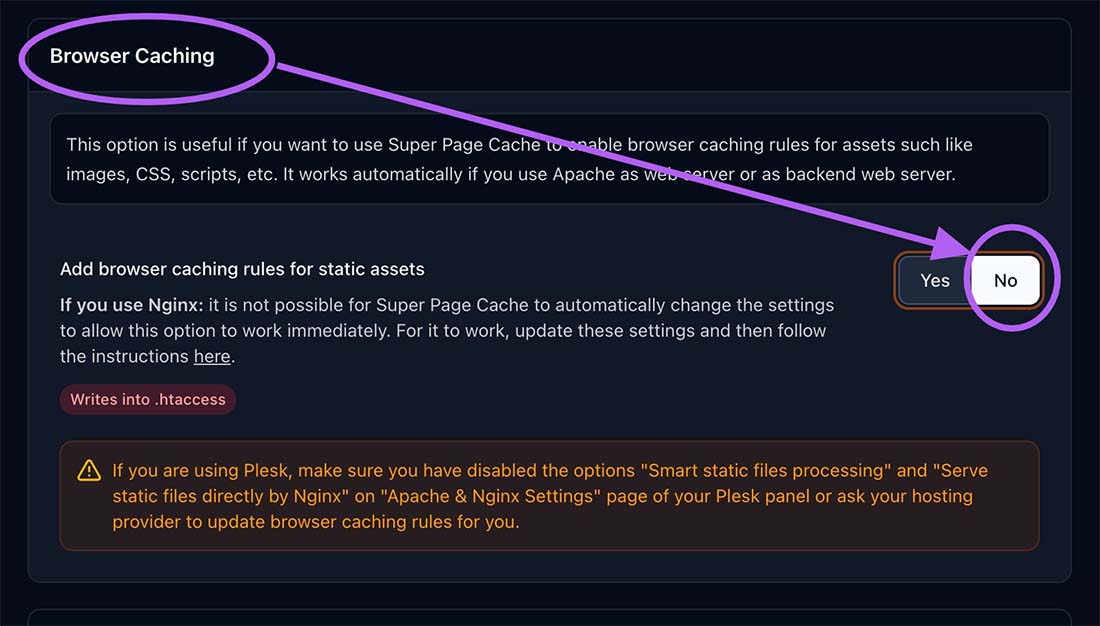
Browser caching:
Ensure you disable browser caching. This is not compatible with a radio station.
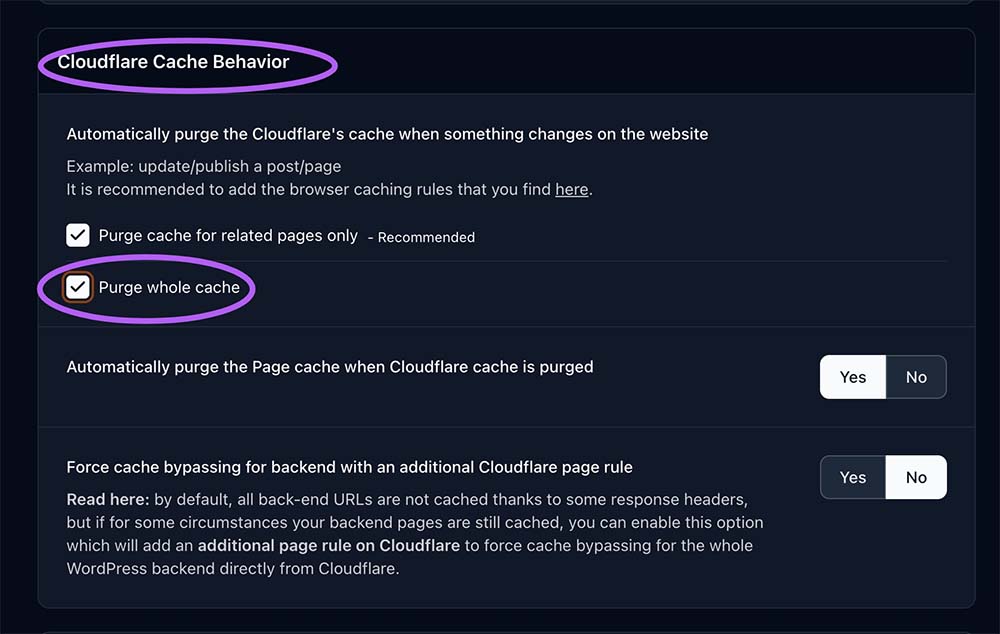
Cloudflare Cache Behavior
Make sure to select Purge whole cache.This will ensure that when you change the name of a radio show, or the schedule timetable, the change will reflect on every page of your radio station website.
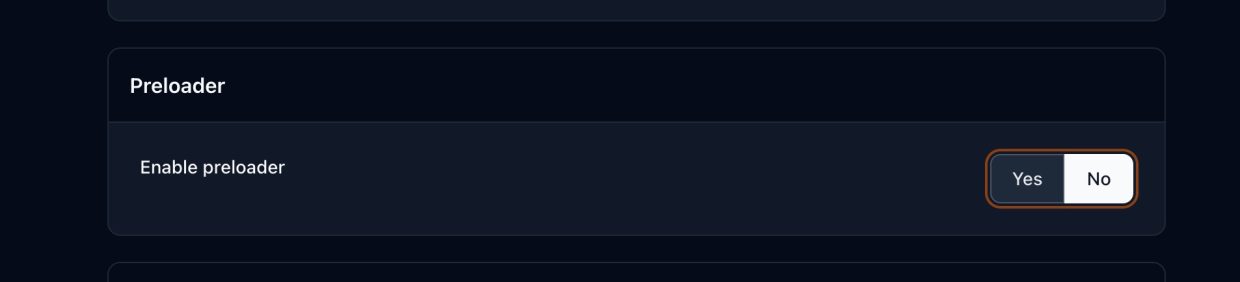
Preloader: NO
This option often mess up the website as it breaks Elementor page css, and causes a CPU load peak on your server
Finally, set up the connection with Cloudflare.
Make sure to get your API Key from your Cloudflare profile page.
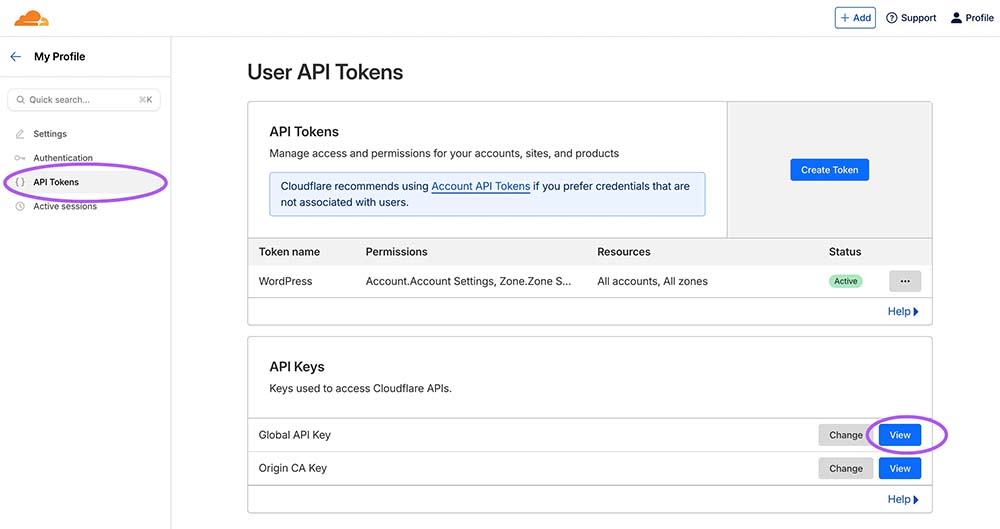
Now in the wordpress Dashboard > super page cache > Cloudflare tab, set up the API Key.

Enable Cloudflare cache
Click the button YES in “Enable Cloudflare CDN & Caching”

Finally, update the settings.
From the right column click Update Settings. This will copy your custom cache rules to Cloudflare.

Elementor issues
If your site, like Pro Radio, uses Elementor, an incorrect Cloudflare configuration will cause problems: broken pages, contents not updating, missing design styling.
To prevent this:
- Ensure the Super Page Cache settings are correctly configured as in the details above. In particular, about the Elementor exclude rules.
- If you see broken pages, go to Elementor > Tools, and click “Clead Files & Data”
- From the top menu bar > Super page cache, click “Purge whole cache” and wait 5 minutes
Final recommendations
Once Cloudflare is set up, it’s strongly recommended to check your website from multiple websites, clearing first your browser cache, to ensure everything is loading fine.
If you want our team to configure Cloudflare for you, just get in touch, it will be our pleasure to help.
Please remember setting up Cloudflare or servers is not part of standard support, and the service is calculated on the specific website and environment.
Conclusion
By setting up Cloudflare and optimizing caching, you’ve boosted your website’s performance, making it faster and more reliable for your audience. Thank you for watching, and stay tuned for more helpful tips!
Get instant access to the download link for your free social media templates!
Full transcript
This is how to set up Cloudflare for your website and improve the performance. It doesn’t matter if you are using our Pro. Radio hosting or if you are on any other hosting provider, this works with basically any hosting provider and is an excellent tutorial for radio stations. Most radio stations cannot really use the classic caching methods, which usually cache the page for too long, resulting in displaying outdated information on your website. Now, if we want to make a more scientific check, we can use this tool, webpagetest.org.
We are now going to implement Cloudflare with a free account and we are going to check the improvement on the performance. First of all, what we want to do is go to Cloudflare and create an account. Now we click at “Add a website” and we are going to add our domain. Cloudflare is going to take care of scanning the DNS for us. But what’s important to know is that it may fail sometimes. If it fails, it may forget some relevant DNS records. What you need to do is to go where you host your domain and check your actual table of the DNS. So, this is what it found now, and we can check our actual DNS in Cpanel.
So, we are going here, go to “Zone Editor” and check our DNS records. As you can see, we have many more records than what it found. Sometimes Cloudflare can find all of the records, sometimes it doesn’t. We use a special DNS protection which sometimes prevents Cloudflare from finding all of the DNS. But the only record that we care now for the purpose of this test is the A record, which is your main domain. So, in a real case, what you want to do is one by one to copy these records and click “Add Record” and make sure to choose the proper record type, which you can find here on type, and one by one copy them over your Cloudflare table of the DNS frequently. This is very important because otherwise, for instance, you are not going to receive emails.
Now, in our case, the relevant record is already here, so we click “Continue” and we are going to receive a confirmation page that says “Change your name servers”. What we need to do is to change the name servers for our main domain and set them to the parameters that are provided by Cloudflare.
To change your name servers, you need to go where you purchased your domain. In our case, the domain was purchased on pro.Tradio, so we are going to our client area to change our name server. Since this domain was purchased on pro.radio, we go to the client area, click on our product, and on the domain. And here you will find name server on the left. We are now using our default name servers and we are going to change them to the ones provided by Cloudflare. Name servers are changed and you can go to “whatsmydns.net” choose “Name Server” and “S” and you can see that the old name server is still showing. So we are going to pause the video and come back in a little bit to see if the change took place and we can continue with the last step of the setup. Okay, we can see that after about 1 hour the name servers are already up to date. You can use this Chrome URL to make sure you can clear your Local Host cache. Once done, look for the URL of your website and this will allow you to see the IP and you can see if it is going through Cloudflare or not. And if you have this problem with too many redirects, just go to Cloudflare, click on the SSL options, and make sure this is set to “Full” or to “Full Strict”.
“Full” normally works fine.
Reload and the website is going to open fine. Once done, we need to go to plugins and search for “Super Page Cache for Cloudflare”. This plugin allows to set the proper caching parameters for a radio station website. Install and activate this plugin and now we are going to link it to our Cloudflare account. So, go to the dashboard and you will see a new item on the top menu. Go to Cloudflare, click on “My Profile” and “API Tokens”. Use the global API key and paste it in the Cloudflare API key space. Compile your email, you can leave log disabled, and save. Once done, in the cache tab, set to 120 and 10 seconds, then make sure to enable the purge cache and add these entries in the “Prevent the following URLs to be cached”: admin. PHP with wildcard, then wildcard nox, wildcard nocache, and wildcard QT proxy URL. Leave all of the other options on default. Then in the “Other” tab, you can optionally enable “Auto Prefetch URLs on Mouse Hover”. Once done, save. Enable page caching. We run again the test so the performance will improve noticeably. If you leave Cloudflare working for about 24 hours. But if we run the test again straight away, we can see that the start render time is already about the half and the first content full paint is already the half. So from 4 seconds, we are at 2.6 seconds. Thank you for watching and see you on the next video.


You may also like


Copyright 2019-2026 ProRadio® Qantum Themes SL® ESB02979078 All Rights Reserved