- arrow_back Home
- keyboard_arrow_right Web Radio Tutorials
Performance: how to speed up your radio station website
Web Radio Tutorials 34 324 Pro Radio WordPress Theme April 28, 2022
How to speed up your radio station website and increase the loading speed.
[Updated April 2022]
This article will explain how to achieve better performance and faster loading time with a little bit of effort and essentially for free, for your radio station website using the Pro Radio WordPress Theme. In the attempt to demonstrate the real results of our efforts and to adopt a scientific approach to our explanation, we will include real screenshots of the results achieved with our optimization process.
The complete optimization path will count 10 steps, and we will list 11 in total including a first security backup.
- Backup your website
- Test to measure our initial loading time before the optimization
- Server check
- Server optimization
- Plugins optimization
- Page structure optimization
- Radio channel settings optimization
- Images optimization
- Caching
- CDN
- Security
- Final results
1. Backup your website
When optimizing a website, it’s easy to try settings, plugins, or services that are not compatible with our website or plugins. We will show the optimization steps that we already implement in almost every website, but, as every server is different, we can’t guarantee that your hosting provider is compatible with our same methods and services. For this reason, and as a general suggestion for every practice that can harm the health of your website, let’s start with a good old backup of your whole radio station website, in this way, whatever happens, you can always restore the previous point, and restart from there.
Our optimization process can in fact block certain websites by editing the .htaccess file, over compress the source images that you may want to restore at original quality, or create global database modifications that may be not supported.
How to backup your radio station website
There are essentially 3 main methods: a manual backup, a backup made with a plugin, and an automated cPanel backup.
The easiest way is an automated cPanel backup made using Softaculous. This procedure is visible in the first part of our video tutorial about the theme update procedure and is available at this page of the manual.
It’s essentially based on Softaculous: if you installed WordPress from cPanel using Softaculous, you can go to the list of your installations, and click the small backup icon, to create a “snapshot” of your website, that can be restored in a click.
The plugin procedure, instead, is suggested if you didn’t use Softaculous for your WordPress installation. In this case, there are some plugins that can help with this, and the best are:
- Updraft
- Duplicator
- All in One Migration
- BackWpUp
All of them have excellent reviews so we’re not spending more time on their use.
The last method, most complex and slow, is a manual backup. To do that, you should:
- Make an export of your database, from Phpmyadmin or similar interface
- Make a backup of all of your files, for instance with an FTP client
This method, anyway, not only is slower and harder, but is also more subject to errors, and is not infrequent that a database backup cannot be restored because of issues during the backup or upload process, or files can be skipped during the files FTP transfer, so is not the best way to backup your website.
2. Test our initial page load time
To know if we are doing good, we need a starting point to compare with the final result. So, let’s use 3 different tools to verify the loading speed of our pages before and after the optimization. Before you get shocked by the ugly results of those tools, please remember that they are conceived mainly for plain blog or showcase websites with plain texts and images, and not for complex dynamic radio station websites with tons of multimedia functions, animations, and interactivities. So, be aware that if you want to achieve a triple-A grade for your website, you will need to give up on some fancy cool things on your radio website. If you, instead, want the website to be fully interactive and cool, just know that you will never get the same result of a plain pure-text WP blog because that’s achievable only through magic, or through pretty heavy server costs, and not with a 2$/ month shared hosting plan. So, we start from the idea of making the site faster, with a limited hosting budget, and the consciousness that the multimedia functionalities have for sure an impact on the results that we will never magically cut out.
That said, the 3 tools we will use to measure the website speed are:
- Chrome’s network console
- webpagetest.org
- GTmetrix
About those tools:
- Don’t be scared of the results, and feel free to compare any other website using a theme with so many features as yours, in your same server
- Consider they are made for big companies with big budgets and pretty simple/static websites
Browser speed test:
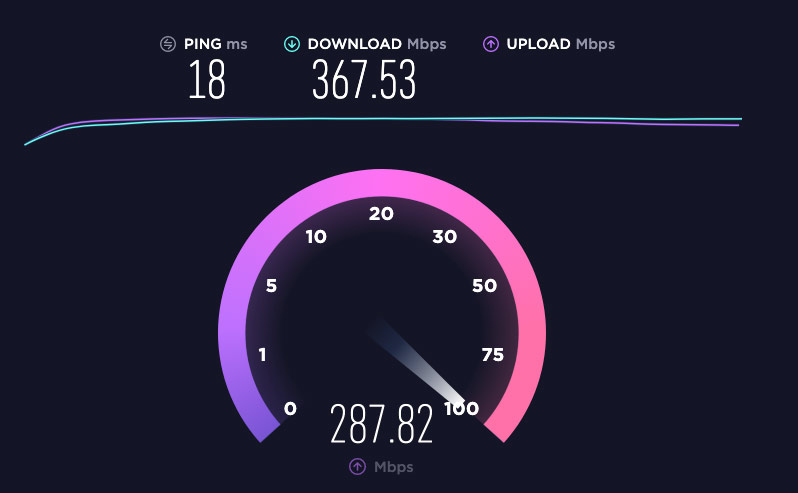
First of all, please remember that this test is affected by your local connection speed, so, you want to make sure you’re not watching movies, downloading stuff or listening to music, and maybe make a test on Speedtest.net to know which is your current connection speed.
Network browser check
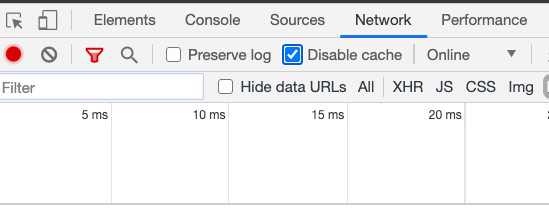
Open an incognito window on Chrome, to avoid cached results, and open the console. Click on Network, and make sure to disable the browser cache in the settings. In this way, the test will emulate as much as we can the first loading experience of a user. Still, it’s better to repeat it at least 3 times, to avoid random connection slow-downs that can occur for ISP reason or other unpredictable connection bottlenecks.
We are testing our first demo, visible at https://demo.pro.radio/wp1/
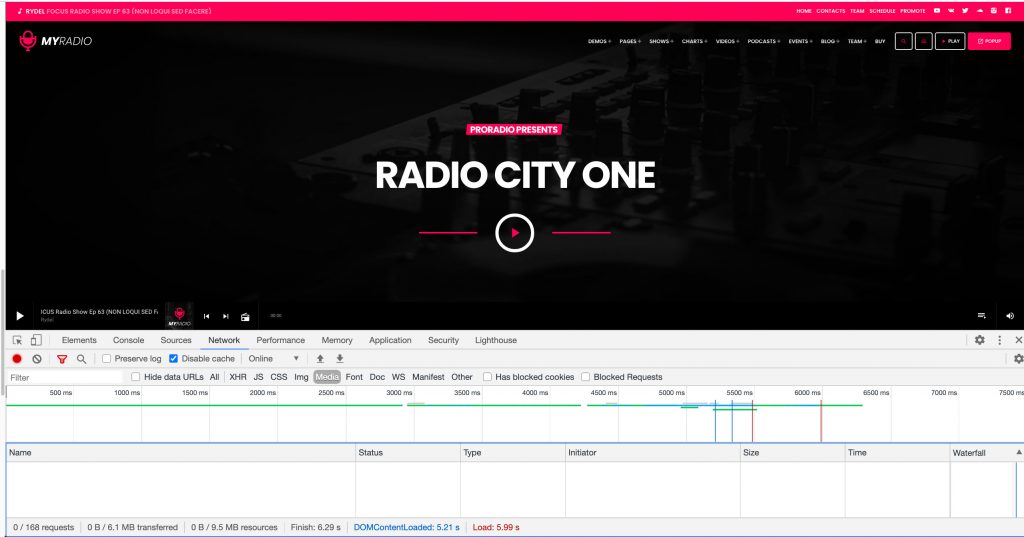
Once done, just type the URL of your website, and check the results. For instance, you can see in this screenshot the results:
Results:
- 168 Requests
- 6.1 MB transferred
- 9.5MB resources
- 6.29s Finish
- 5.21 Dom loaded
There are 9.5Mb of resources, which include HTML, CSS, JS, Images, and other media. This can be improved through caching, minification, compression, and page optimization
DOM Content loaded is 5.21 seconds, and is mostly about server rendering and connection speed, and depends mostly on the number of queries and dynamic contents, plugins, and server CPU speed. This can be improved with caching, server settings improvements, CDN, and plugins optimization.
To make sure to have quality results, you may want to repeat the tests another couple of times.
Important information about your specific radio station website: while observing the page, you may also notice that the Finish parameter, can change after a few seconds. This depends on the streaming settings: if your radio attempts to read external song informations, this parameter can increase up to the time that the song titles are fetched. This doesn’t mean that your page takes so long to load, but only that the latest loaded items arrived at that time.
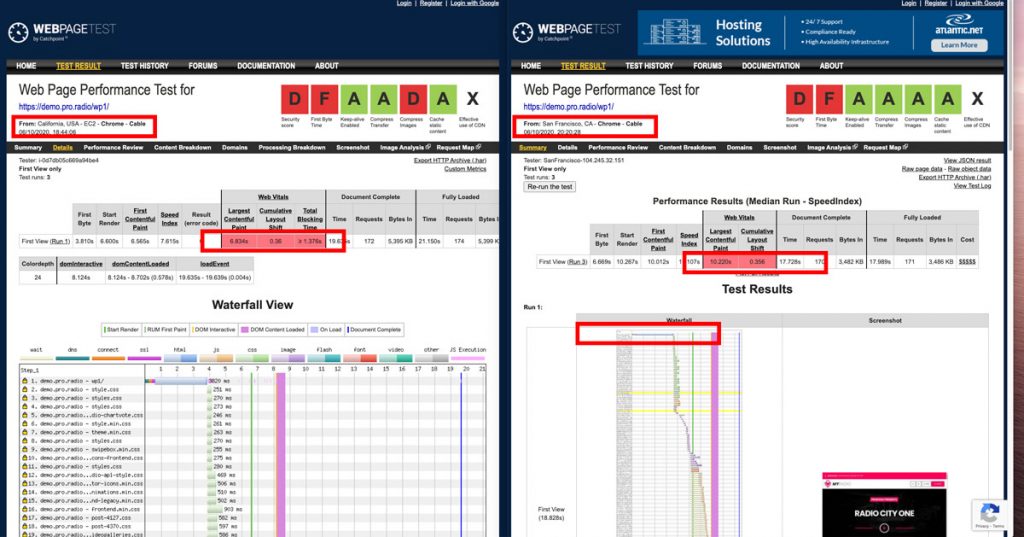
Testing on webpagetest.org
This service offers great detail about the web page performance, anyway is recommended to perform multiple tests, using different server locations. Professionals recommend performing at least 20 tests from 20 different worldwide locations because there are so many variables that can change the results of each test every time, that a single test is never really indicative of the real page performance, and you can get very different results from a test and another.
For the sake of our test, as our market is mainly focused on the western United States territory, we will choose the servers based in California and Desktop devices.
An important detail about the result is the Request Start: in fact, we can notice more than a half-second was used by the test computer to open the first connection, which is possibly caused by the huge distance between our server (based in Germany) and the testing service (California). This is indeed one of the facts that can be improved by introducing a CDN.
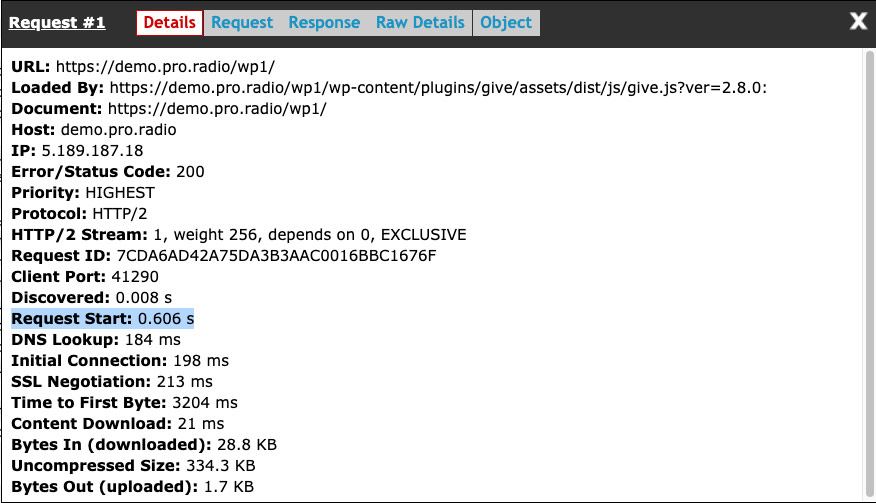
TTFB: The “time to first byte” is the waiting time before receiving something, generally the HTML headers. While many tests focus a lot on this parameter, this is mostly important for extremely simple pages, while if your website has dozens of pictures and other files, this parameter is just a fraction of the total waiting time, and you may want to focus more on the total page render time, which reflects more realistically the real experience of your users, so we suggest not fixating too much on this number.
This time includes the first “handshake“, the DNS lookup, and every step previously required before making the page, and NOT only the time required from the server to create the page.
Anyway, it’s highly affected by the server performance and by the DNS performance, so it’s something we will be able to tweak easily.
Our initial TTFT is on average 3204 ms, we will try to take it down to 1.5 seconds if possible.
In the screenshot below, you can see how the same test performed in 2 different servers leads to pretty different results. The ideal would be to run this test at least 20 times, from different servers, and compare the results.
This test, anyway, gives us a good starting point to compare the final results of our optimization. The current result is obtained without caching, on a server on the other part of the globe, without CDN, and without compression nor optimization.
Our starting point is the following:
- Largest contentful paint: 8 seconds
- Document complete: 18.2 Seconds
- Time to the first byte: 8.4 Seconds
Testing on GTMetrix
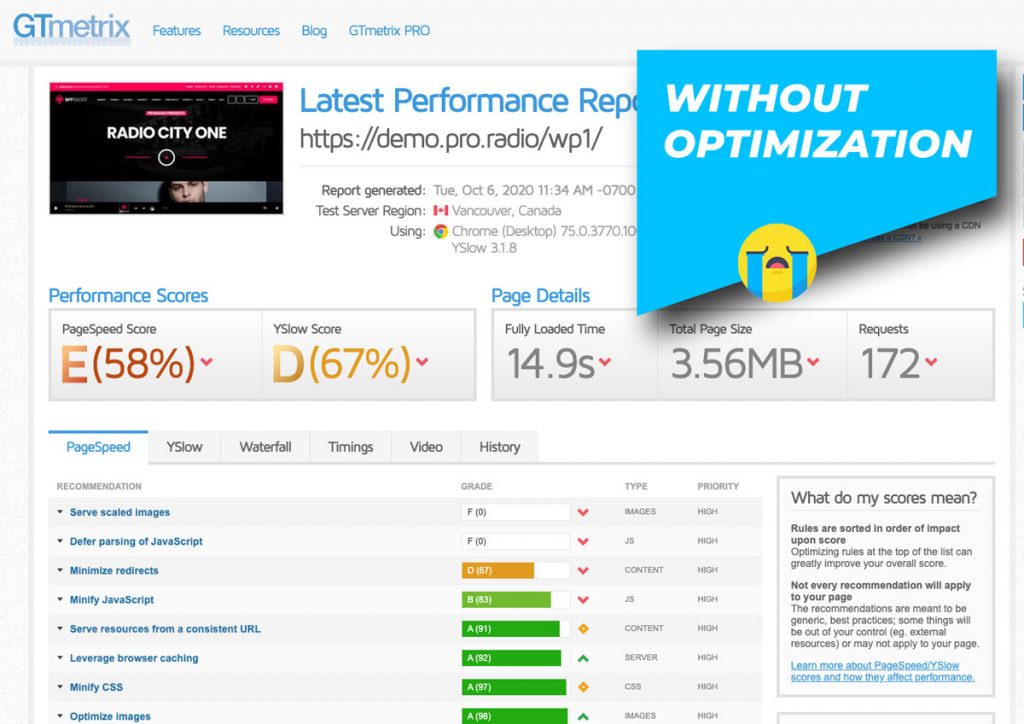
As you can see, the issues are mostly caused by:
- Large images
- Youtube javascript! (Yes, Youtube, the one that punishes you for a slow website, is the one with the most painful javascript)
We will attempt to optimize also those factors, among the others, trying to achieve an A score for our website.
Analysis conclusion:
The performance of this website is being affected by several factors that can be improved using inexpensive tools. We can trust that a positive effect can be achieved in less than an hour of work.
2. Server check
First of all, we need to know which server we are working with. The server is like an engine for a car, you can’t win a race by painting some flames on the side, you need horsepower. So, first of all, let’s try to understand which machine you are working on.
As a generic guideline, if you care about performance (as it’s maybe the reason you’re reading this post) you may want to avoid going for the cheap of the cheap hosting you can find because is the equivalent of running a race with a pedal car, to stay in our metaphorical car comparison. So, if you purchased your hosting by searching “cheapest hosting for WordPress”, you may already want to lower your expectations, in particular for hosting packages below the 3$ a month (few exceptions made for some good providers). It doesn’t mean you can’t use a cheaper hosting package, but for sure you’ll notice a limited performance result compared to a more expensive one.
To understand which type of server performance you can expect, our theme comes with a built-in checking tool: the Pro Radio Server check plugin. Even though the test is pretty generic, and doesn’t calculate factors like multiple connections and global server load, it contains a couple of basic tools to provide a simple index of your server performance.
To use this tool, make sure you have this plugin installed, then go to the Server Check page to see the results.
For more information, you can check the full tutorial here:
https://shop.pro.radio/knowledgebase/5/1.2-Server-check-plugin.html
It works with every theme, so you can use it to test in advance your hosting, whatever WordPress theme or plugins you use.
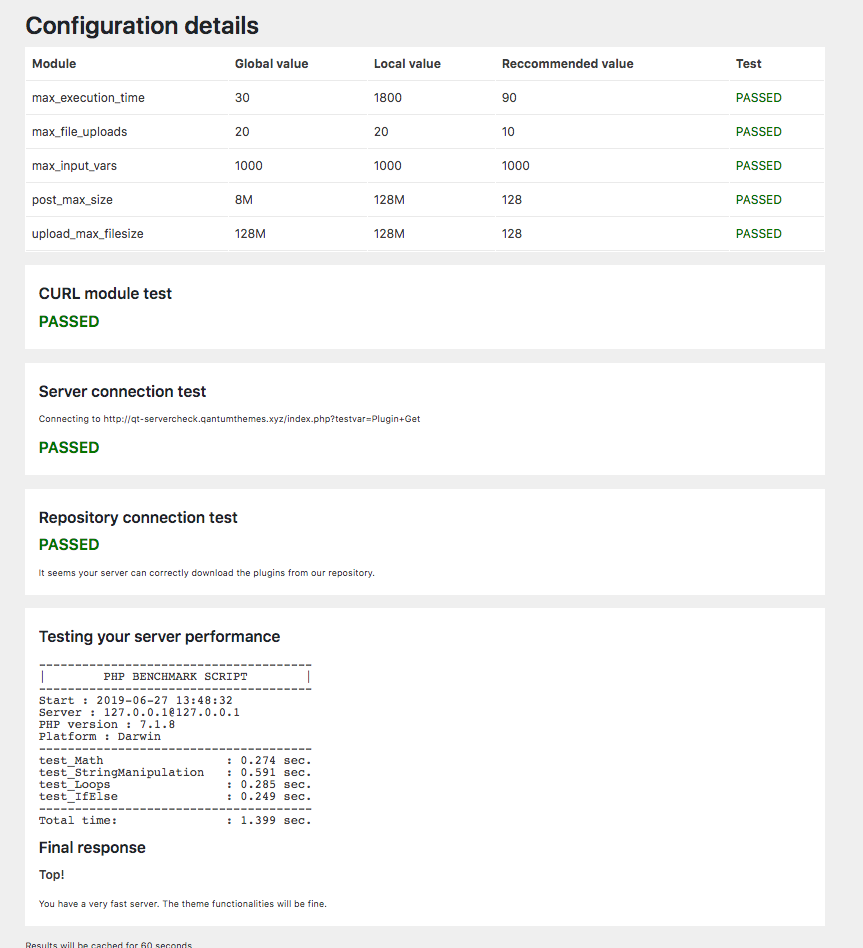
In the last part of the result, you get a generic performance index. This test is based on some standard PHP mathematical calculations, and if you achieve a Total Time above 3 or 4 seconds, it’s recommended to start your performance journey by going for a better hosting package or for a better provider.
Bot don’t be fooled by this number itself: even achieving a low result, for instance under a second, meaning the server is very fast, your website may result stuck for heavy pages, or when many people connect at the same time or have a slow transfer rate for images and scripts.
This is just a starting point: if it’s bad, you may wanna get a better hosting first, but if it’s good, you can’t exclude issues that can’t be detected with this simple test.
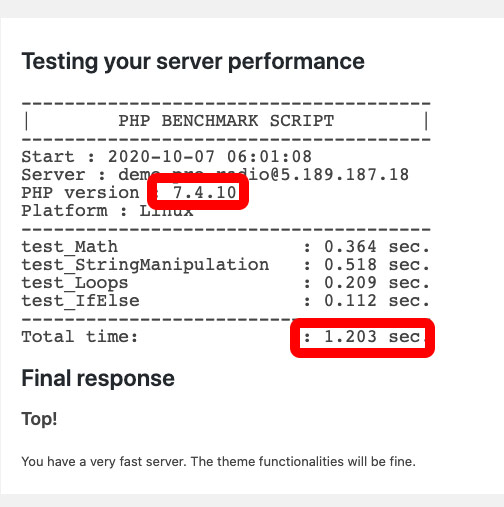
Another fundamental information provided by this result is the PHP version. In the screenshot above, we can see that the website is running in a 7.1.8 PHP environment. The performance can be greatly increased by switching to 7.3 or 7.4. If using cPanel, please remember that the PHP version of a subfolder, like in this case, can be different by the default version set in the cPanel settings. This is achieved by using a directive in the “.htaccess” file, so we are going to modify this version and make sure this site runs in the latest version available.
4. Server optimization
First of all, let’s make sure we use the latest available and working PHP version. PHP 7.4, in some hosting providers, it can be missing some modules required by WordPress. So, you may try switching to 7.4 and check if it works. If it doesn’t, you may roll back to 7.3. Also, it’s important to make sure all of the required PHP modules are available and enabled in your PHP settings.
In cPanel, you can switch the PHP version easily, with a global selector.
- Search for “Select PHP version”
- Set the version to 7.3 or 7.4
- Click “Apply”
- Verify that the required modules are available and enabled
If you don’t see a module listed in the options, it may be enabled by default, in which case, you can use the “phpinfo” command to control the results of your server.
PHP Switching test results
Just by switching to PHP 7.4, we can notice about 0.2 seconds of improvement on the server check plugin results.
Enable compression
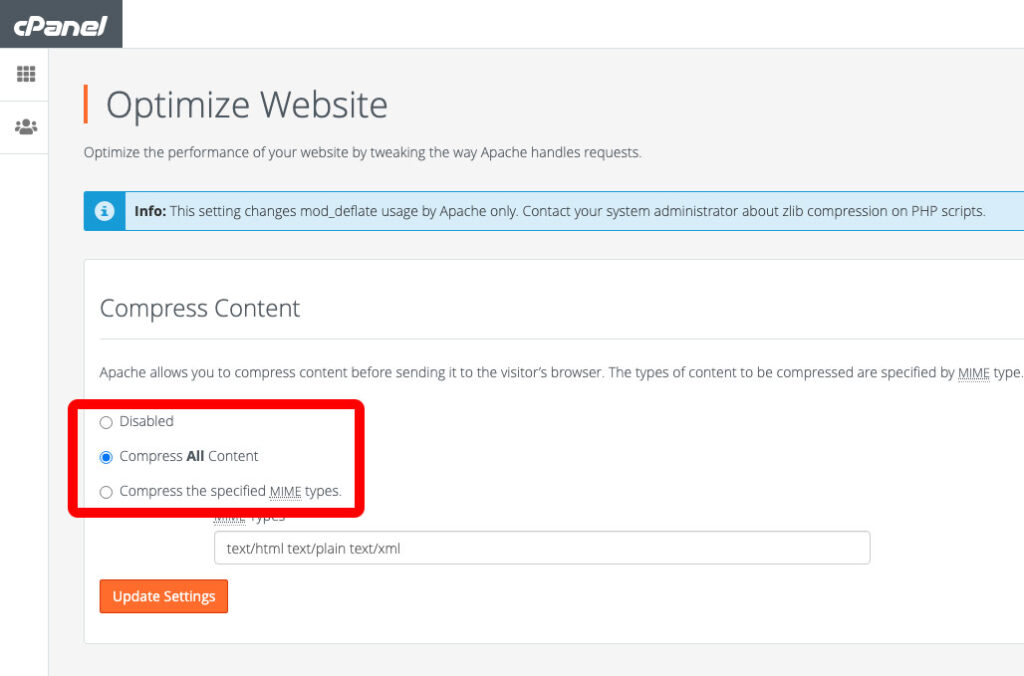
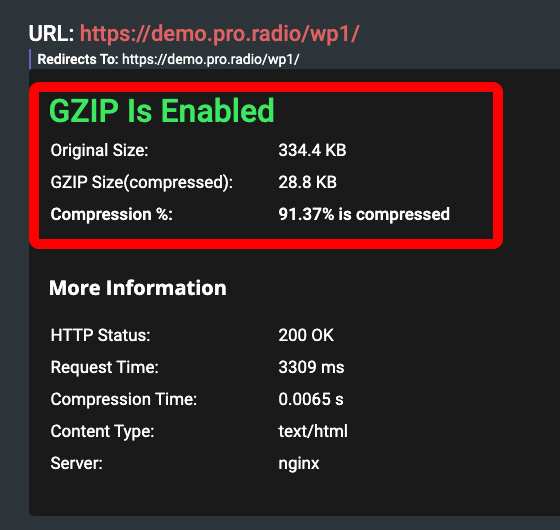
This may speed up the file transfer a little bit. To enable the compression, in cPanel search for Optimize Website, and enable “Compress All Content“. Warning: certain providers, somehow, have settings that may compromise the website functionality when using this function, so make sure that your website works properly, after enabling the compression.
To test if the compression is working on your website, you can use the official page available here: https://www.giftofspeed.com/gzip-test/
As you can see, this little trick is saving more than 300KB during the web page transfer.
That said, there isn’t much more you can do in a shared hosting plan, and 90% of the most important optimization tweaks are only available to the server manager (your hosting provider) so it’s important to choose a good provider who has experience in large WordPress websites hosting, because your server’s CPU and RAM are not the only important parameters. Their settings, in fact, are crucial for a smooth WordPress environment.
Without getting into much detail about this, if you manage your own server and Apache configuration, make sure to find the best parameters about:
- Keep-Alive
- MaxKeepAliveRequests
- KeepAliveTimeout
- MaxClients
In order to speed up the page delivery, we are now going to optimize another aspect of the WordPress installation, that can really inflict a hard slash to your page speed: the plugins.
5. Plugins optimization
We often had to help customers with performance issues and, guess what, most of the time the issue was caused by an outrageous amount of plugins, or from a couple of very heavy ones.
Yes, our themes come with many plugins, but they are mostly very light plugins made to work well together. This is very different from heavy complex plugins you may add to do complex tasks, such as WooCommerce, chats, forums or similar.
So, the first thing you may wanna do to optimize your website is to switch off extra plugins that may be using up your server CPU and memory.
A good example of a heavy plugin, that requires a powerful server, is, for instance, WooCommerce. It’s an excellent plugin but, to run, it requires a better hosting plan than an entry-level.
So, the first step to optimize your page rendering speed is:
- Disable all of the plugins (you took a full backup, right?)
- Enable ONLY the plugins required by the theme
- Still, if you don’t plan on using one or more of them, like video galleries or the Places maps plugin, just turn them off
We’ve seen website owners complaining about the slow speed of their website, and blaming our themes, once logged in their admin, there were 50+ active plugins. The admin interface itself was barely loading.
If you are one of those cases, this step of the optimization procedure is for sure the most important.
Let me repeat: turn off those plugins!
Once done, we can speak 🙂
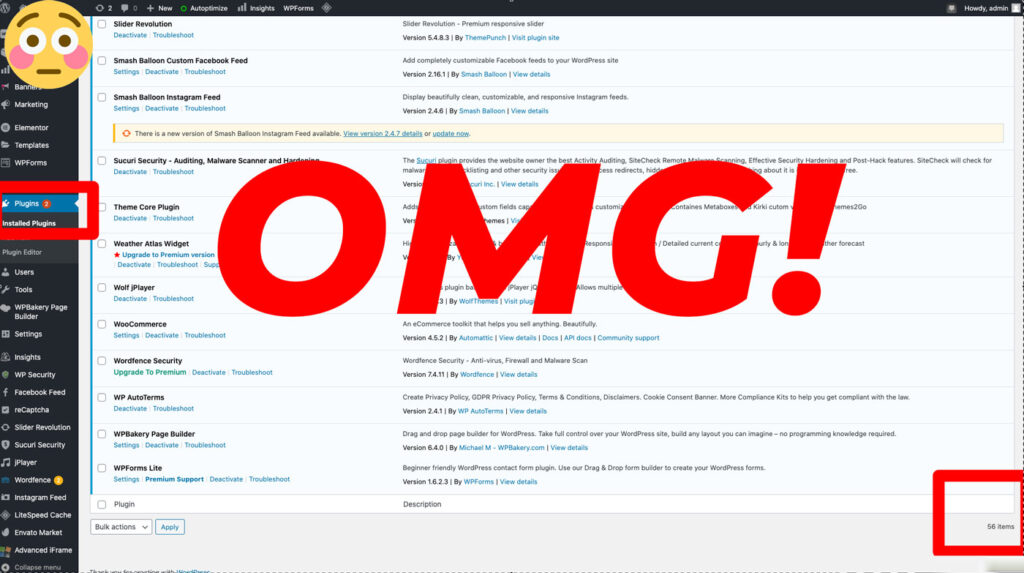
A real plugin nightmare case:
In the screenshot below, taken from a real helpdesk support case, you can see an example of a situation you should avoid. After answering to a performance fix request, and checking the Plugins status, we faced the following scene, a clear example of what you don’t want to keep a good performance:
Blaming the theme for a bad performance with almost 60 installed plugins is like loading an elephant in the trunk of your car, and blaming the car for the speed.
If you have special needs that require so many plugins, a good solution may be to make a clone of your site or a separate new installation in a page, and create a custom landing page for that specific function, for a separate shop page, special offers, subscription forms or similar, off-loading the weight of the plugin from the main site.
6. Page optimization
Assuming server speed and caching can cut down the page generation time, still, there are 2 phases of the total speed to optimize: contents transfer and page rendering.
The content transfer is the time required to move HTML, CSS, JS, images, and other media to your computer from the server. This can be still optimized with a CDN and HTTP2, but it’s highly related to the total amount of information to transfer, and, in particular, with the number of images and to their total weight. The page rendering, which is the last step, depends on the complexity of the page and of the time required to transform the code into something that you see on screen. Both those 2 parameters are directly proportional to the size and complexity of the page.
In simple words: the more stuff you put on the page and the longer it is, the more time you’ll need to load it.
That’s just math, and if you really need to take performance seriously, the best thing is to consider a simpler home page, instead of a one-page website.
Yes, our demos do contain a lot of stuff, but their purpose is in fact to be a “demonstration of the theme potential”. This means that we need to stiff as much as we can in a few pages, to display all of the widgets, shortcodes, and templates in a few pages, for the sake of a demonstration website. This isn’t meant to be a realistic website, but more a starting point from which you can more easily build your own, by stripping down the unneeded items.
So, for instance, for the sake of testing the page speed potential, you may want to create a slim home page with a very basic structure and verify the difference compared to a complex one-page website.
The heaviest items to keep in consideration are:
- Videos: especially if from YouTube, they really are the worst enemy of loading speed.
- Sliders: quite deprecated from modern website design, sliders require huge and heavy images, and the content is not all immediately visible. Also, the number of slides should at least be kept around 3 items.
- Carousels: carousels are nice, we love them too, but if you put 12 items in them, don’t complain about the loading speed, as that’s a lot of extra HTML and images to load. At least, limit the number of items, or, if you really are all about speed, don’t use them, and go for a static element instead, like a posts grid, or a current show hero item.
- Background images: if you really do want to use them, consider using decorative gradients, shapes, or textures. A huge picture may be pretty heavy, and a 300Kb background image for a section is a NO if speed is what you aim for.
As our demo site is meant to impress, we use high-quality images, lots of contents in any page, videos, and all of the things mentioned before, along with less weight-relevant contents such as lists of posts and grids. Still, our performance is not that bad, but to achieve a 2 seconds landing time, you will need to make choices.
There is no specific rule but, while attempting to optimize the loading time, it may be useful to find a balance among the elements, leaving the ones you judge as essential, and maybe deferring some to other pages.
So, for this step, just reconsider the content of your radio station home page, and strip off some contents, starting from huge images and videos, and removing unnecessary sections.
Charts special mention
The Pro Radio WordPress Theme allows creating chart tracklists with a live sample to listen to the songs. The sample field of the chart tracks is pretty flexible and allows us to use an mp3 file, a Youtube video, a SoundCloud song, or a Spotify song.
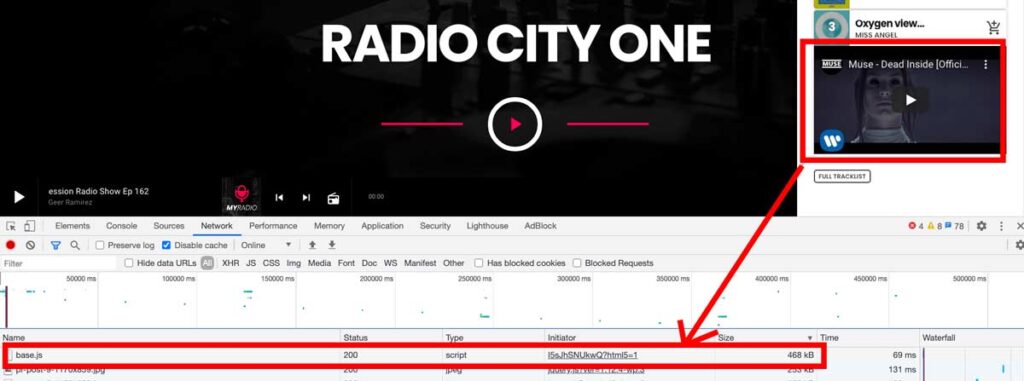
Anyhow, for every external resource you add, such as a YouTube video, extra javascript will be loaded. This means that adding to your pages a chart tracklist with 10 YouTube videos will result in more than 12 Mb of pure YouTube javascript added. This will be a real rock to load for your visitors.
Our theme, instead, is fully integrated for tracks reproduction, and using an MP3 file loaded in your media, or in any other server, will result in zero extra load impact, and optimize your website performance really a lot.
In the example below you can see the weight caused by one YouTube video to your page, it’s very variable and is mostly the same for SoundCloud and other networks.
As you may understand, avoiding external content is one of the most effective tricks to speed up the total page loading time.
7. Radio channel settings optimization
Our radio station music player has the optional function to display the song titles from your Shoutcast, Icecast, or alternatively-supported streaming server type. This connection, while optimally working, is based on a client-side connection between your visitor and the streaming server, to read a text-based result containing the song titles.
Anyhow, to override poor configurations of certain streaming servers or outdated servers like Shoutcast V1, our player provides alternative methods which are:
- Server proxy
- ICY Metadata
Server proxy
The server proxy, optionally activable for specific channels, is required when a streaming provider is not allowing your visitors to connect directly, to read the titles. This is caused by wrong Cross-Origin Resource Sharing connections, that prevent Ajax from reading the Icecast or Shoutcast titles. The proxy passes the streaming titles connection through your website server, causing an extra load for the CPU, for every connected visitor.
Even though this is a quick and easy solution for lazy or thick-headed streaming providers, is not a sustainable solution for small hostings with many visitors. If you need to use a proxy, remember that this is negatively affecting the whole performance of your hosting, and creating a bottleneck for an increased amount of visitors. To solve this, you may find a better provider that doesn’t require the proxy or asking your streaming provider to enable CORS.
ICY Metadata
The ICY metadata is a piece of information provided within the audio stream itself. It is pretty much the streaming equivalent for a web radio of the classic ID3 tags of an MP3 file and can contain the required information such as song title, artist name, and more.
The Icy Metadata is available, in our player, for your radio settings, as an alternative to the Shoutcast or Icecast methods, and they act as a fallback for obsolete streaming providers that do not use any standard format to provide the information. ICY metadata are generally available for every radio stream and are generally used by client players such as iTunes, Windows Media Player, Winamp, home devices, car stereos, and similar.
There is literally nothing bad with them for such uses, but when it comes to applying ICY metadata to a website, there is a major problem causing additional performance trouble: to read them, as they are contained in the stream itself, you need to literally download a little piece of the MP3 stream in the server, every time interval, to find the title contained in the headers.
This task, differently from the standard ajax connection, required your website server to perform a heavy task each time it needs to read a title, instead of just moving a text file from the streaming provider to the client browser directly.
To make a comparison, imagine you are moving home: using ICY metadata is the equivalent of having every person moving any box, reopening it, and checking what’s inside, every time they need to move it.
So, if your streaming is a Shoutcast V1, or any other incompatible, encrypted or unreachable format that works only with the Metadata format, just be aware that this is slowing down your server, and stressing the CPU. So, you may want to go for a better streaming provider or test every other possible setting to avoid this process.
8. Images Optimization
Pictures are usually the first cause of slow loading speed. An average home page has nowadays about 100 images (or more). To achieve a faster performance there are essentially 2 things to do:
- Attempt to reduce the number of pictures
- Reduce the size of the pictures
How to reduce the number of pictures
That’s clear: if you have 100 or more images in your page, you have to reduce the total amount of items. The first places to start is sliders and carousels, and, in particular, cut down the number of items to show.
If you have, for instance, an “upcoming shows slider”, you may want to keep it with 3 or 4 items.
If you have an upcoming shows carousel, once you have 5 or 6 items it’s already a good amount. Or, in the alternative, just display the number of items that are visible in the row. So, if you display 3 items per row, set the total number of items to 3. You will have no hidden items, less fanciness, but a much better loading speed.
Reduce, in general, the number of pictures everywhere. This will cut down not only the total amount of images data but also the amount of HTML and the total render time for the page.
How to reduce the size of the images
The most frequent cause of slow page loading speed found on our customer’s websites is the presence of heavy images. Some people just don’t know that, for a website, images should be compressed before uploading.
Who comes from a more professional web design approach, may be well aware of the popular “export for web” function from Photoshop. This functionality allows reducing the total KB size of a picture of up to 80%, without losing too much of the quality.
This is a fundamental step that should always be performed before uploading any picture on a website. If you don’t have Photoshop, the same function is available for free on the website Photopea, a fully online Photoshop equivalent, where you just upload your image and use the Save for Web function.
While visiting a website with optimal performance, you will notice that pictures may almost always look less-than-neat, often a bit pixelated, and that’s caused by the JPG compression.
In the end, if you need the result, a couple of jpg artifacts are not gonna damage your business, as you’ll receive as counter-part a great decrease in loading time, an overall increase in visitors, and a lower bounce rate.
Another parameter to keep in mind is the global image size, as 80% of the average screen resolution size worldwide, is between 1330 and 1600px width. This means that, if you upload a 3000px wide image, that’s slowing down everybody, at advantage of a 1% of visitors that are really on that screen resolution.
Leave for a minute the whole retina and 4k 8k 10k story: just look at what big magazine and companies do: compress, compress, compress! The advantage won’t only be in the single loading time performance, but also in the total bandwidth consumption for your server, which is important if your website has a considerable amount of visitors.
Bulk resizing
Let’s say you already loaded hundreds of images and is unthinkable to manually compress them. Well, you’re not the first with this problem. In fact, there are already plugins out there to help with this.
The most famous ones, which we often used ourselves, are:
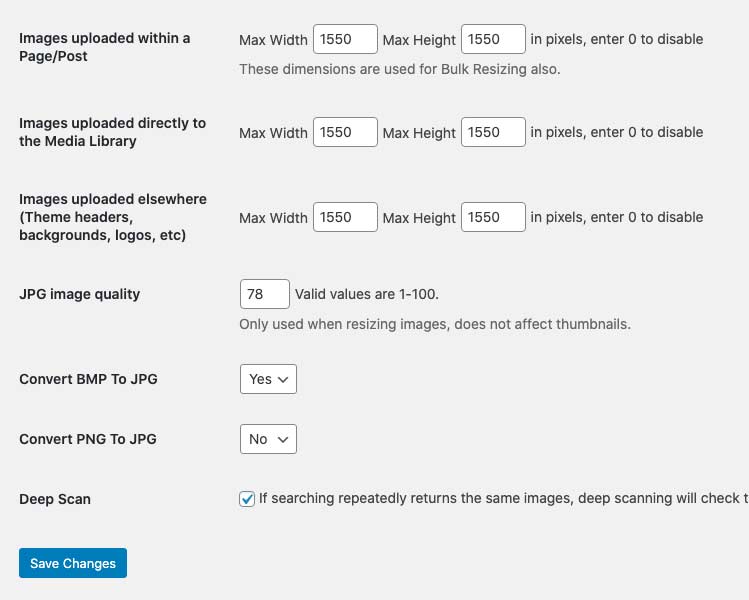
- Imsanity: that allows you to bulk resize all of your pictures and eventually convert PNG to JPG.
- EWWW Image optimizer: that applies another type of optimization to the pictures, including the removal of unneeded information
Before using any of those plugins, just make sure to backup your uploads folder, as the effect is irreversible.
An example of Imsanity setup for performance (remember to backup your Uploads folder before running the bulk resize).
9. Caching
Updated April 2022:
after so many tests we concluded that the best performance is achieved using Cloudflare (free account) and the plugin “Super Page Cache for Cloudflare“.
It’s super easy to set up, you need to simply set the TTL to 5 minutes and connect the API keys (important: you will need to enter them twice because it seems it loses the credentials after the first setup).
Once done the site will start caching and you can achieve a much better performance than with other plugins. It also allows managing the LiteSpeed cache and clearing it with the same timing of Cloudflare of your TTL. This will prevent displaying outdated information about your radio shows and schedule.
Plus (leave the minification OFF in cloudflare!) it’s so basic that you don’t risk to mess up the website, it doesn’t break styling and javascript and doesn’t cause conflicts among the plugins, which is the main reason we are dropping W3TC.
WARNING! OLD CONTENT BELOW! WE DON’T RECOMMENT W3TC ANYMORE.
WordPress caching plugins are a useful tool, but they need to be used carefully, and only as of the last weapon. There are many of them, some are easy to use, some are more complicated, what you want to remember in your choice is that your radio website is not just like any other: there are players, additional plugins, and tons of inter-communicating functionalities.
For this reason, a radio station website is much more complex than a simple magazine or blog, and a plugin that works amazingly for 99% of the websites, may seriously harm the functionality of your player or schedule because they’re simply not meant to work on such a level of software complexity.
This step needs to be taken only as the last procedure, because caching a website with poor options or other issues is like making a carbon copy of a mistake, making it harder to solve the issues that should have been fixed before.
That said, we tried almost every caching plugin out there, and there is one simple reality you should consider: bulky plugins like WP Super Cache, WP Fastest Cache, and similar, generally describable as 1-click caching solutions, are simply NOT going to work for your radio station website. The reason is very simple: they work great to apply generic caching and minification for a normal blog, but they are simply not meant for your type of website and theme and will end up breaking the functionality of player and other plugins.
To use caching on a radio station website, you need to use a professional plugin with the granularity required to correctly set every aspect of the caching procedure, enable and disable the proper options to avoid breaking the functionality and respect the responsivity of the website functionalities.
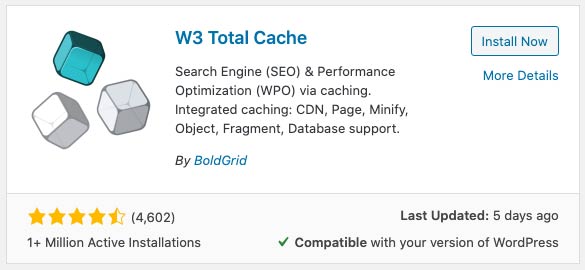
For this reason, after many tests, we found out that the best free caching plugin for a radio station website is W3 Total Cache.
This plugin, in fact, has a lot of options that allow compressing and caching the right things, maintain your schedule and upcoming shows functional, avoid breaking the player and, of course, increase the performance.
In particular, you want to:
- Use a short caching expiration time, as you want to display the current shows and not the ones from a week ago
- Disable CSS/JS compression, because this compression doesn’t consider that theme and plugins need to interact together, meaning that compression can break the functionality
- Compress HTML
- Set expiration headers for the HTML and files
In this chapter, you can see our suggested settings for a radio station website using W3 Total Cache.
Here’s some test done after activating the caching with W3 total cache and waiting a bit for the website to create the cache for our radio station home page.
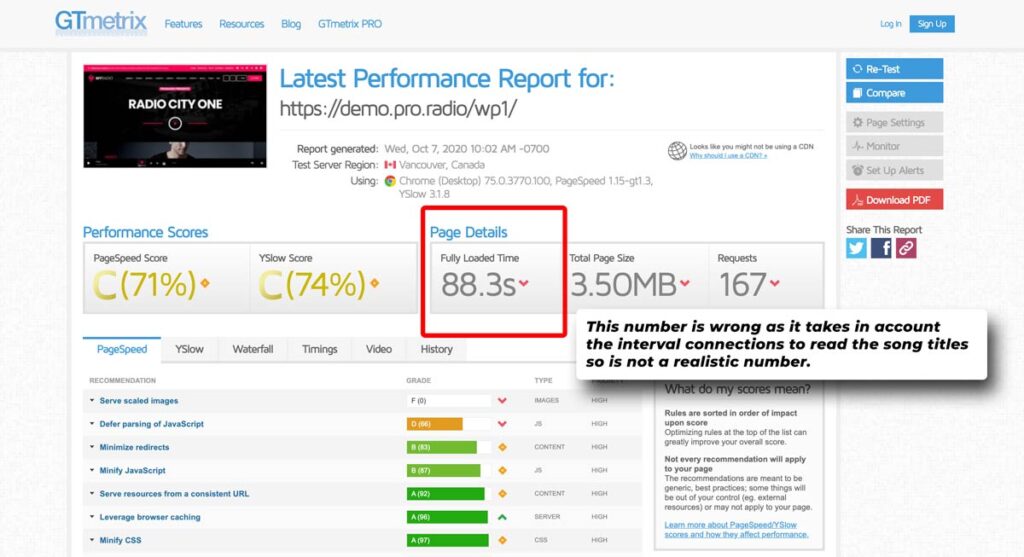
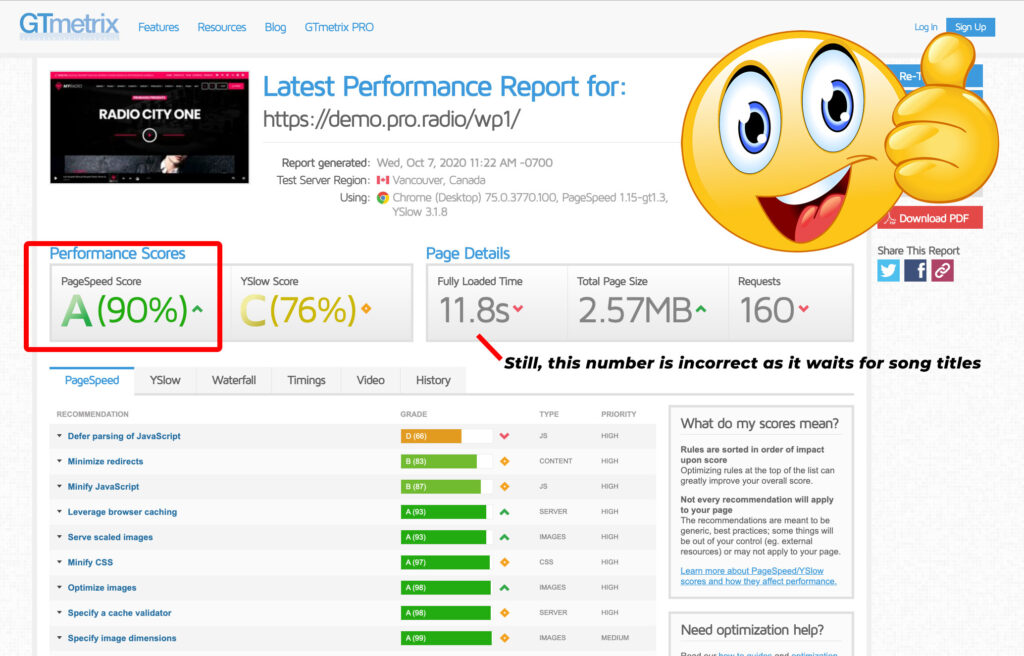
With the Pro Radio theme, the GTMetrix does sometimes register a wrong fully loaded time. This happens because it waits until the javascript loads the song titles, multiple times, until the test times out after 90 seconds. So, this parameter is clearly bugged.
We can see a noticeable improvement in the overall score, from an E ranking to a C ranking.
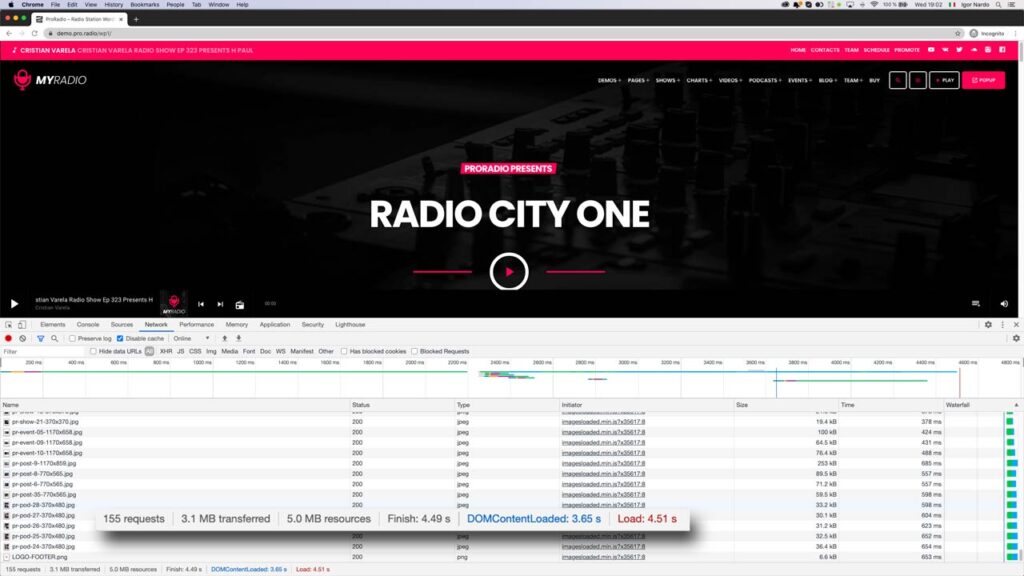
With the Chrome Network test, the result is improved as well.
Old results without caching:
- 168 Requests >
- 6.1 MB transferred
- 9.5MB resources
- 6.29s Finish
- 5.21 Dom loaded
New results with compression and caching:
- 155 Requests
- 3.1 MB transferred
- 5.0MB resources
- 4.49s Finish
- 3.65 Dom loaded
We can say, with the tweaks introduced until now, that the loading time from our same browser, without local file caching (fresh page load) is almost the half. Quite an improvement, and for free!
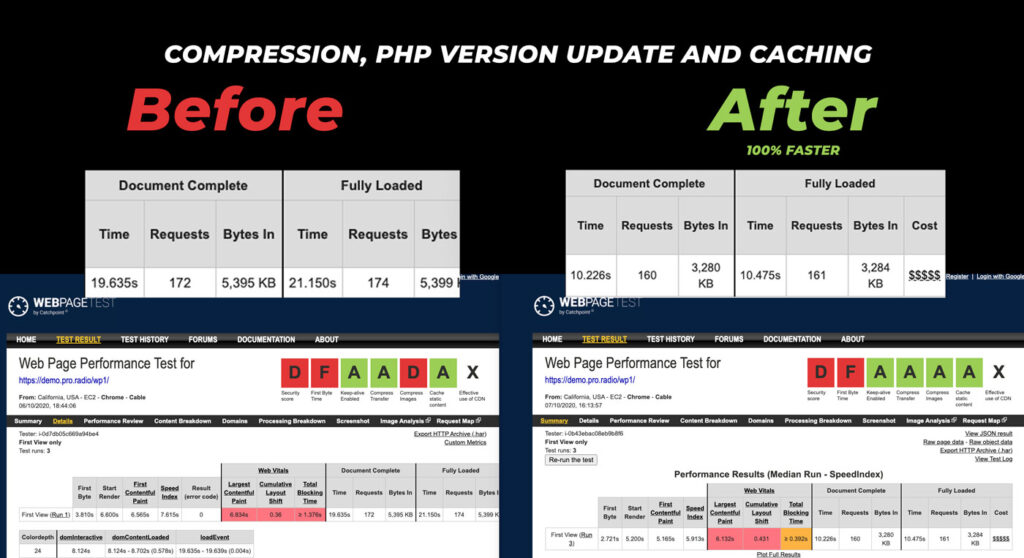
The most interesting result is with the WebPageTest.org results. It appears the improvements made our radio station WordPress theme 100% faster. The total loading time went from 21 to 10 seconds.
The “bytes in” parameter confirms the browser network results, with a 50% cut in the total page weight, and a double speed performance. The tests have been performed on the same servers.
The last optimization steps we are missing are adding a CDN and a security plugin.
As we are testing from a very far connection (USA West VS European servers) the CDN will probably bring another positive effect on the loading time, as the files will be transferred directly from the USA CDN installations, instead of serving them directly from the European connection. Let’s see the next optimization step.
10. CDN
A CDN (Content Delivery Network) is an excellent way to offload the traffic from your server, speed up the website, and increase the performance and the security. There are literally dozens of CDN out there, but, in this article, we are not discussing which one is better for WordPress, we will just go for the cheapest, easiest, and yet powerful option, which is Cloudflare.
Cloudflare is one of the best CDN out there, and it has a great entry plan that, for free, will help you get to the performance result you want, and save you money by offloading the traffic from your server, by offering to your visitor cached results.
Without taking too much time to explain how to implement it, you may want to check your cPanel software, as you can probably enable Cloudflare directly from there, instead of manually, in about 5 minutes. The effects of the CDN will be visible once the DNS is propagated and your pages are cached, usually within 4 or 5 hours from the setup, but it may depend on other factors specific to your website, domain, and hosting provider.
What it does
A CDN, in general, will improve the performance of your visitors worldwide, because once it starts to work and cache the website properly, the files will be provided using the server closest to your visitor. This means that, if your hosting provider has the server in the United States, and a visitor connects from Europe, with a CDN the files will be server from Europe too, saving precious milliseconds for each tiny file and piece of code, and causing a great overall performance improvement.
It will also save your server from unexpected peaks of visitors, by serving cached pages instead of requiring your Apache to generate a new page for every visit.
The bots and spam protection will as well protect the server from undesired traffic, preserving the CPU from serving the purposes of evil hackers.
Paid plans:
While a free plan is usually good enough for most of the hobby radios, if you want to get the real deal you may want to go for a Pro plan.
There come 2 main advantages with it, hard to be achieved with other tools:
- Increased security options: you can manage hacking attempts and brute force attacks with a better granularity, saving the weight of thousands of connections, bad bots, and fake visitors from your hosting provider, and maintaining a better average performance speed
- Images management: a Pro plan can serve to your visitor’s images resized on-the-fly for the exact size you are using. This will also produce a better score in the GTMetrix score
Important:
It is normal, once you enable the CDN, that for a while your website has a slightly worst performance. In fact it takes time for the connections and for the cache to settle, and you may see the effects after a few hours, or a day.
11. Security
If you have enough management experience, the constant increase of “evil” traffic is something you are used to. The amount of daily attacks on random websites is nowaday reaching a few million a day. You don’t need to be famous, nor a bank, to have your site hacked or brute-forced. Most of the time, hackers are simply trying to inject ads into your pages or to use your server as a “pivot” to launch other spam or phishing attacks. So, any site is good.
While our themes and plugins are created in the respect of every security best practice, is not impossible for a website to be hacked, especially if using low-security measures like a weak password.
The attacks are almost always based on basic WordPress backdoors, such as XMLRPC, outdated PHP or WordPress versions, pirate plugins (which you should not have), and admin-ajax pages.
Most of the attacks are based on finding the password of the administrator. Once found, performing nasty actions like adding a malware script to a website is a breeze. For this reason, a weak password, or a strong password that is shared among other email or social accounts, is almost always the first cause of a hacked website.
And, even though you may think you have nothing important on your website, you may take into account that, if a hacker spams millions of users from your server, because of a weak password, you will be considered as the first responsible for the law.
For this reason, the very basic security best practice is to use a complex combination of username and password, to make it impossible to guess from a hacking software. If your username is admin, for example, or part of the website domain, it will take just a couple of hours to software to guess the password.
Nowadays, with a few minutes of work, you may also take advantage of a 2FA, a 2 factors authentication, which, like your bank account, requires to introduce a pin generated on your phone, to login to your website WordPress admin.
It’a good choice to also disable XMLRPC, which is only needed if you plan on posting to your website from external client apps.
You may also consider changing your WordPress admin URL to something different from wp-admin.
Another important defense system is as well installing a firewall, in order to block in advance any hacking attempt, or anybody using a wrong password many times.
How does security relate to performance?
Simple: hackers suck CPU and memory. In fact, to try to find your password, a hacker attack tries thousands of different combinations. For this reason, the amount of CPU required by a hacking attempt is quite a lot. Every attempt uses a little bit of power from your server, compares the credentials to the ones stored in the database, and creates a new HTML page using PHP, just to respond to the hacker that the password is wrong (if you are lucky!).
WordPress, on its own, is meant to be used with millions of users at the same time and doesn’t implement any security measure to throttle this type of behavior.
For this reason, there is potentially no limit to the number of resources that a hacker can use from your server.
So, if your website appears inexplicably slow despite a good hosting plan, you may want to check your access log, and you may find out that it’s being caused by dozens of login attempts by third-party hackers from around the world, with different IPS and different usernames.
If you are lucky, and they don’t break in because you had a good password, still you may see your website going down, with a 503, 603, or other error codes, meaning all of your resources have been exploited from a brute force attack.
Other types of attacks are bad bot scrapers: software meant to steal content from your pages, made to scrape every page, image, file, and text and copy it on a remote database, to resell it or build a clone of your website.
If you want to stop all of this, to speed up your radio station website, and to make sure hackers don’t compromise your success, you may want to increase the security of your WordPress installation, and block those attempts right when they happen. Most of the times, in fact, when a hacker starts an attack, he will desist once he finds that your security levels is high, and goes away to find easier prey.
The easier way to do this is to use a plugin. We already tried many of them, and, in the range of the free tools, we came to the conclusion that WordFence is possibly the best out there: doesn’t break your website, is easy to use, and is free! So, our suggestion is to study how to use it, install it, and start blocking those tedious bots harming your success.
You will notice a rapid improvement in the server performance and, if you ever noticed any off-line issue or slow website performance, it will possibly be over.
12. Final results (Hooray!) Our radio station website optimization is working!
Now that compression, CDN, optimization and caching are enabled, we run again our tests.
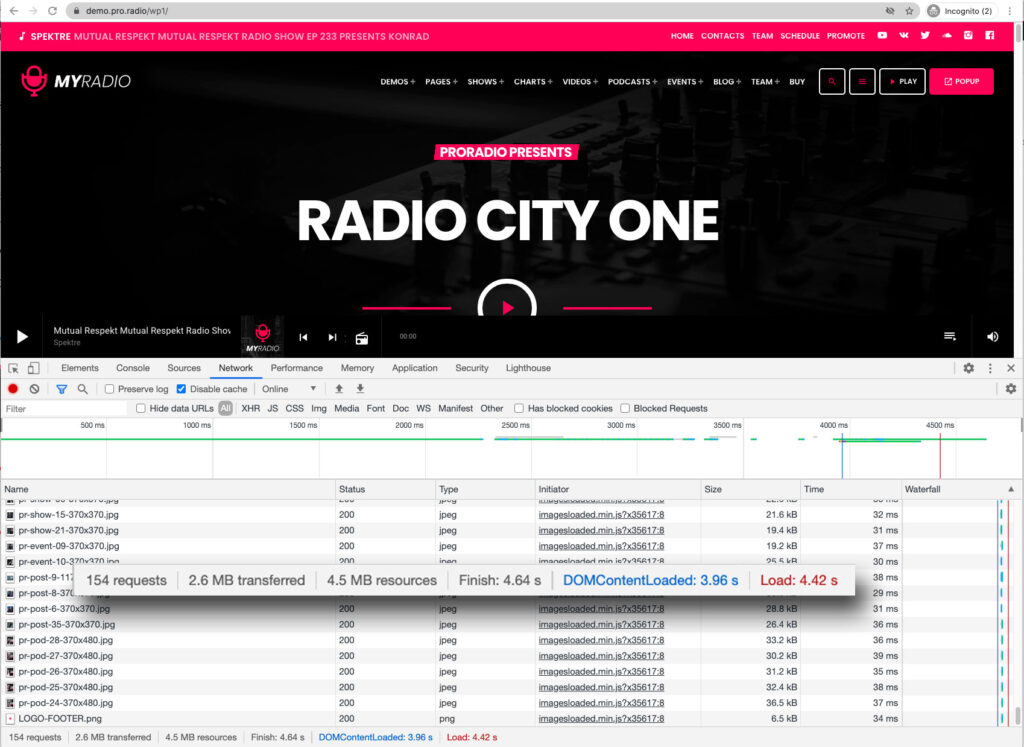
The Chrome network test confirms another small improvement, meaning that the CDN is starting to work as well, even though just a few seconds passed. Our radio station demo website is now about more than 150% faster than before the optimization!
Old results without caching:
- 168 Requests >
- 6.1 MB transferred
- 9.5MB resources
- 6.29s Finish
- 5.21 Dom loaded
New results with compression and caching:
- 155 Requests
- 3.1 MB transferred
- 5.0MB resources
- 4.49s Finish
- 3.65 Dom loaded
Final results with CDN
-
- 154 Requests
- 2.6 MB transferred
- 4.5MB resources
- 4.64s Finish (0.2s higher than before, can be random factors)
- 3.96 Dom loaded (0.3s higher than before, can be random factors)
Anyway, you can see that reaching an A grade performance level for a radio station made with the Pro Radio WordPress Theme is easy and inexpensive, doesn’t require any programming and can be achieved with a few simple steps, in about an hour of work.
Pro Radio has the full potential to become the official website of the next big radio station, without extra costs and with simple tools available to anybody!
Still, if you want an even faster loading time for the home page of your radio station, you may think to cut down big images, replace carousels with simpler objects, demand the weekly schedule to an internal website page, and keep only the essential. Is not impossible to reach a loading time under 1.5 seconds with a simpler page, and you may even think about switching to a faster server, upgrading your CDN plans to a professional one, and increasing the caching time of the WordPress pages. It mostly depends on what you want to achieve, and what you really want to keep on your pages as essential content.
How to speed up your radio station website with the Pro Radio WordPress Theme: conclusions.
Yes, this post was long, but the subject isn’t easy, and it should probably require much more discussion than this. But, if you follow the suggestions adapting them to your specific server and radio website, you will for sure obtain a positive effect for the performance. There are many ways to speed up a website without spending extra money, and while creating our Pro Radio WordPress theme, we always kept in mind the optimization for the performance.
This is why our theme and plugins come with pre-minified CSS and JS, a minimal HTML footprint, and a pre-optimized HTML structure, saving you extra work on this front of the optimization process.
But, as you have seen, there are many details that only you can work on, and the results will for sure lead to a positive increase in your traffic and radio station success.
If you want to invest more in your radio station, and you want to have a professional check-up for your website or an optimization service, please don’t hesitate to get in touch with our support, we will do our best to help you.
If you are planning on building a radio station website, Pro Radio WordPress theme not only has any tool you need but has all the horsepower you need to build a strong, fast and reliable radio station website.
You may also like
Copyright 2019-2026 ProRadio® Qantum Themes SL® All Rights Reserved

